Steps in Using Filemod
There are several steps in using the filemod
program. They are shown here. And yes of course it is much faster
after you have used it a few times.
1.
Get the Files Ready For Change in the Computer Itself
a.
Ensure files to be modified are in the same directory (folder) on your
computer – and are the only files in that computer target directory
b. For
simplicity best if using only one directory that has no subdirectories
c. If
using internal directories, exercise care to ensure that all included
directories within the main one that you will target contain files that
also are to be modified.
2.
Adjust Filemod to look at the right directory and files to be
modified
a.
Adjust the drive name on the upper left of the program to the correct
drive that will contain the files. It is normally set to “C”
drive
b.
Select the correct directory (folder) on that drive by selecting it
within the middle program area called “Directory(s)
to Modify”
c.
Ensure that the files to be modified are now shown on the left screen.
If using multiple directories, those directories will show on the middle
screen “Directory(s) to Modify” but not
the file list box on the left.
d.
Ensure any included directories include all files to be changed. If
not, use a file manager to move directories and or files till the
directory you are aiming at is safe for all files to be modified
3.
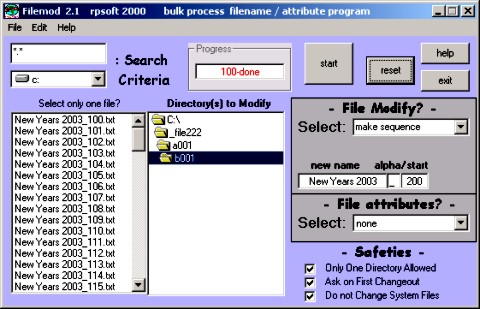
Set Filemod options
(more information on these below)
a.
These options are listed below. Change the text combo box (the text box
with the downward arrow under “- File Modify? -”)
to the correct choice by clicking the downward arrow with your mouse and
making the selection. The selection you click should then show in the
text box when done.
i.
To rename file names, use “make sequence”.
Note that after making that selection, that you will then be given the
choice to change the name – shown as “name” with your mouse and keyboard
to another, perhaps “NewYears” for example for new years photographs.
You can also set the sequence starting point.
ii.
To change many extensions to the same one select “extension”.
Then note that you will be asked the extension name to change to.
Include the “.” also, such as “.txt”
iii.
And so on
iv.
To change only a single file name, select “only
one” or simply click the file on the left screen directly and
watch the options change automatically to “only one”
b. If
attributes are desired to be changed, then instead of using the upper
combo box, select using the lower one under “-
File attributes -”
c. Best
to change only one type at a time – either names or attributes, but not
both. If you wish to change both the name and the attribute, do two
passes
d.
Decide on safeties. It is of course safer to work on only one directory
with no internal directories (folders). If so, best to leave all three
safeties on. If using multiple directories and you have checked to
ensure safety, then you must temporarily turn off the safety “Only
One Directory Allowed”
e.
Verify your settings before the next step and running the program. It
may be hard to go back to what you had
f. If
concerned, copy and save the files to be modified to another location in
the computer before the next step and running the program
4.
Running Filemod
a.
Again, verify the settings, the directory to be modified, and the files
inside before pressing “start”
b. When
ready, select the “start” button with
the mouse
c. If
you have left the safety “Only One directory
Allowed” on and there is more than one directory included (nested
directories inside of the directory you have chosen) then the program
will halt and give a message.
d. If
you have left the safety “Ask on First
Changeout” on – and that is a great idea by the way - the program
will ask about the very first item that it is to change. If you have an
error, this is the last stopping point to fix it, so please review it
carefully. If all is well, then continue the operation.
e.
Filemod will signal when done and tell in a text box in program upper
middle how many files were done. The directory and file box may change
while work is being done. That is normal.
5.
Done!
a. File
change results should show in the left file box.
Relevant Links
(includes this page)
return
To rpsoft 2000 software
|