|
|||||||||||
| rpsoft2000 SCREEN CAPTURE SOFTWARE MULTIPLE SHOTS | |||||||||||
|
|
|||||||||||
|
|||||||||||
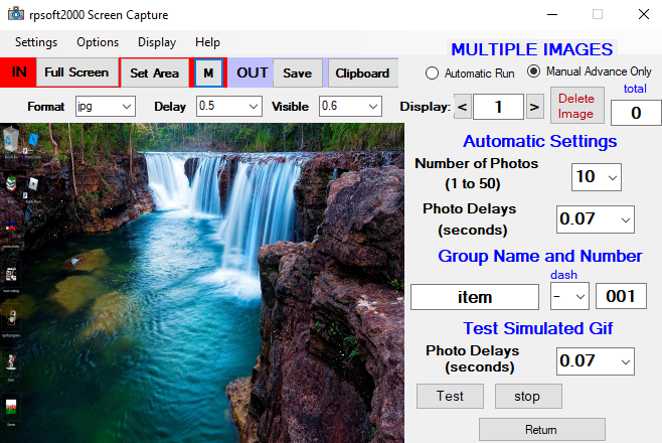
| Mutliple Shot Mode | |||||||||||
| Why? | |||||||||||
| Someone might just want multiple
shots of the same event to pick and choose from later. Or perhaps
they want to use multiple shots as the beginning items to use with a
movie or gif program. You can have up to 50 multiple shots. Note that Multiple Shots only allows the usage of "set area" instead of full screen, expecting that full screen would be too large file size. If this bothers you, please note that "set Area" will allow you to set large screen sizes as well, if you wish. |
|||||||||||
| Usage | |||||||||||
| Best to set the name you wish
under group names and number first before shooting. This might make
automatic shooting easier later. Note that the number on the end is
not for individual photos, but for each group of photos and would be
the automatic numbering for the folder name of each. And so, you
could move quickly in automatic and take several groups of photos
each and want group name and number to auto number the folder names
for you as you go. For the Automatic mode, you would click that option at the top right and then set the number of photos and also the photo delays to a timing in seconds. Then press the space bar... (many other keys will work as well except for enter and esc) and it will take the desired number of photos and then stop. Then you can save as jpg, png, gif, or bmp. Note that if you choose gif it does not combine the photos into a single gif. That would require a second program that we do not currently make. However, you can choose from four types of photo image saves. For the Manual mode, you would click the space bar for each photo you wish. Ensure less than 50 since there are only 50 internal fast storage locations. Then pressing enter or esc key will take the last photo. When done with either, you would use the "save" files option since it would be too much for a clipboard. When you choose a name, that will be the name of the folder that contains the images. The images will be inside with the same name as the folder, but with numbers on the end added of 01 as high as 50 in order. Test? Yes, there is a test button you could use to see the photos you just took with multiple shots and you can set the delay. This will give an idea on how they might look in a gif or movie image. It might also tell you that one of the photos needs to be deleted. Using the more upper display more near to the top, with the arrow < > keys, you can manually go to an image that you do not want and delete it... if you wish. |
|||||||||||
| Return to Screen Capture Program Main Area | |||||||||||
|
|