| |
 |
|
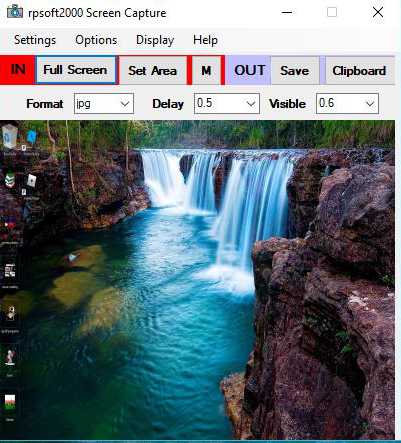
Screen Capture
A simple program really, but
one that we use a lot. This program can take a "photo"
of images on your windows computer screen, either full
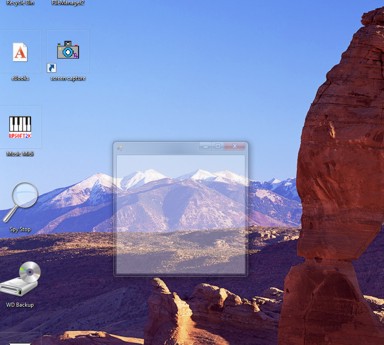
screen or by you defining an area. The area adjust is
shown below. Those are the two buttons and
choices for "IN" shown in the image on the left.
After receiving the image, it should be displayed in a below
picture box such that you ensure that this is really what
you want. Then the two "OUT" buttons give you a choice
of "Save" for saving it to your computer file system at a
place you decide, or "Clipboard" and puts the image only on
the computer clipboard for you to retrieve with a drawing
package of your choice.
For save options, the first
drop down box shown on the figure high left says "jpg" which
is the normal setting. If you click on the option
arrow on the right of that box, you can also save the image as
a "bmp" or "png" style. |
|
|
|
Click here to view some
common applications (usage) for such a program
OPTIONS / DEFINITIONS
Buttons
- Full Screen - captures
the image of the entire screen. This might be a good
option for those who wish to use a drawing package to cut more
precisely around the image desired.
- Set Area - Allows a
semi - transparent area to appear for you to set over the area
of screen capture desired. Just press most any keyboard
key when done to capture the picture.
- Save - When an image is
present below, this allows you to save to a file location in
your computer
- Clipboard - When an
image is present, clicking this sends the image to the computer
clipboard. Many drawing packages can read from a
clipboard. And control paste (ctrl-v) also can allow it to
be pasted, as is, in some documents.
Option Boxes (arrow on
far right allows drop down items inside that can be selected)
- Format
- gives choice of
picture format to be saved. Options include jpg, bmp, and
png
- Delay
- This is the delay before the picture is taken. It allows
the photographer, the program in this case, to leave the area
and get out of the way. The delay is in seconds. The
larger the delay, the more time between the program hiding and
the picture being taken. If you see ghosts in your images
showing, see if it might be this program itself. If so,
you would increase the amount of delay time to give the program
more time to exit. I consider this "shutter speed," but of
course it is really a delay instead. If you need a longer
delay, remember to "Save Settings Now" under "Settings" above to
do this more automatically for you. Values in the drop
down box go from 0.2 seconds to 5.0 seconds.
- Visible - This option
and drop down box is for how visible the semi transparent
rectangle will be for setting screen capture area. The
arrow on the right allows drop down values from 0.2 (20%
visible) to 0.8 (80% visible)
Mutliple Shots: Now
Can do Mulitple Shots at once and save to a folder!
Click here
for more on that.
Animated Gifs? - Cannot do
that by itself, but can be part of the operation.
Click here
Upper Drop Down Box Options
There are options for saving the settings
now, and or savings the settings on exit. If you choose to
save settings on exit, note that the Save Settings on Exit item
under "Settings" should be checked, since the program will look for
that. If you are confused about settings, you can always reset
them to their initial state under "Settings" by selecting "Return to
Initial Settings."
There should also be a help file included.
SPECIFICATIONS
- Picture Formats
That Can be Saved: jpg, bmp, png, gif
- Delay Settings
- Some variations given from 0.2 seconds to 5 seconds.
Nominal is set at 0.5 seconds
- Visible Settings
(visibility of the rectangle used for area capture): 0.2
(20% visible) to 0.8 (80% visible) in stages
- DPI - the image saved
was tested to be 96 dpi on the tests we made. This seems
to be somewhat standard for computer screen images that we have
noted in past
- Number of Multiple Photos
(in multiple image usage = 50
|
|