|
Bargains from the Sponsor: |
(software programs for the Windows PC Computer)
Music
music chords guitar /piano made easy !
Blackjack
Super Blackjack Game with the Latest Hint Charts ! Also does Spanish 21 and more!
Software Utilities
Email Address Program that puts you in Control !
Metric / English Conversion Calculator and more!
Webmaster
site crawler
program, check
reciprocal links
and more
Modify file names and attributes, even many at once!
Store www addresses, password names and passwords conveniently !
|
The Corel Image - Sprayer Imagine if you could spray life-like images, anywhere on a digital picture or photo. You can with Corel Photo Paint 8 or similar utilities. Furthermore, Corel even gives you a number of pre-stored images which can include flowers, tools, leaves, clouds and much more. You can even make your own images to be added - or even a collection of images. Neat! Where is this fabulous image - sprayer? It is on
the "toolbox" toolbar - which is one of the main toolbars. If you
don't see the image, it is under the brush image, or effect image, at
one end of that toolbar. Pressing the arrow at the bottom of the
brush image shows all of the possibilities, as shown below. The
one that is the image - sprayer to be selected, is the one on the far
right, as shown here:
Practicing with the Image Sprayer As with the other tools, some practice with the image
sprayer is needed. Start out with a new blank white area, and then
select the image sprayer. Next, it would be best to select an
pre-stored image to spray on the new white screen. Select the icon
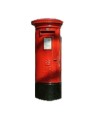
Simple Undo Commands - To Help Control Image Spray Because you may wish to "undo" some of the image - sprayer commands, some knowledge of easy undo methods is helpful. Under the pull down menu "edit" you should find the command "undo brush stroke" - or undo of your last command, whatever that may have been. This command will undo your last brush stroke - or last image object spray. Note also the hot key that is set up for "undo brush stroke". This hot key should be printed at its right. Since I have set up some of my own hot key designations, I am no longer sure which original ones came with this program. In my case the hot key "f12" will undo the last brush stroke. So, basically, whenever I press the left mouse button for the image sprayer and an image appears that I don't want, I can quickly press the f12 key and it will go away. Easy. How to set up your own hot keys to the way that you like? You must have a picture or new picture loaded into Photo Paint 8 for all of these options to work. Then under "tools" you will find "options". Inside "options", next expand out "workspace" to its options if it already has not been done by pressing the "+" sign in front of workspace till it becomes "-" and the options below it are shown. Similarly, expand "customize" under "workspace" until it shows its options. Under "customize" you will find "shortcut keys" - yay ! that's the option that you want. Click on that. Then on the left are the menu items, which can be expanded by pressing the "+" in front of any of them. Select an item for a shortcut key on the left, and then set up the shortcut on the right. Note that you might have to eliminate a favorite key's current use by selecting "delete conflicts". Checkpoint and Restore to Checkpoint Also under "edit" in the pull down menu are "undo special", which if you move your mouse to the right will show that you can set a checkpoint, or later return to that checkpoint. In my case I have hot key f10 set up to set a checkpoint and f11 to return to that checkpoint later. The good impact of this is if you wish to experiment, perhaps with the image sprayer. You can set a checkpoint, in my case by pressing f10 at any time. Thereafter you are experimenting. If you don't like your experiment, press f11 and your picture will return to the checkpoint. This is really a nice feature. Of course if your hot keys are set up to other than f10 and f11, you will have to use the hot keys that you have set up to do this. Making an Image for the Image Sprayer (single image) First of all of course, you need to acquire the image. One of the places that you can get images is from the internet itself. How? Just right click on an image and choose "copy". Then when back in Photo Paint 8, under "edit" select "paste as a new document". If this seems a lot of work in Photo Paint 8, recall that you can set up a hot key for paste as a new document. I use ctrl-Z, but pick the hot key combination that you like. For a picture in our digital photo section I wanted a British mail box. Where would one get one? I looked on the internet, and there one was. The below photos show some of the work to use the photo after I copied it from the net.
Now, when done with this, the image was ready to be loaded into the image sprayer. Note that it is best to take full advantage of the fact that the image sprayer can work with ".cpt" pictures that have portions of their background invisible. This makes it easy to combine them into a new picture with the least interference. To load the picture into the image sprayer, select the
image sprayer tool. Then click on the image sprayer save icon
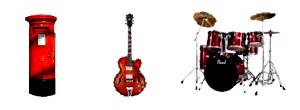
Storing Multiple Images in a Single Image Sprayer Setting Storing multiple images in an image sprayer single item is a little bit harder, but not terribly so. There are a few techniques that must be known. First, begin with a "new" white area - that is sized to hold all of the images that you will need for this item. Add each image to it one at a time. Do it similarly to above, by removing unnecessary background area with a mask. But then when done, use "Crtl-C" or "Ctrl-insert" to save it to the computer clipboard. Then select the new area and use "Shift-insert" to transfer the image there. Move the image to the far upper left to make room for more. Note that you may wish to size your images using the "resample" function under "image" in the pull down menu to keep them all roughly the same size. For the second image, again paste it to your new area, keeping it just out of reach of the first image, and so on. When done, you should have multiple ".cpt" type pictures copied to the new white screen area. We did this for just three images, and they are shown below in the so called "new area". The gray color was done on this web page background to more fully show that the image size and white background.
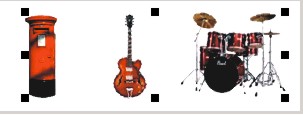
The next item is very important - one must select each of the multiple images on the "new area". How to do that,? Hold down the "shift key" and select each of the three images with your mouse by pressing the left mouse button. When done, the dotted area should encompass all three images, as shown below.
Next? Well, at this stage, the hard work is over,
Just save this selected image (really 3 items selected) as before.
Ensure that the image-sprayer tool is selected, then select the save
image icon Note: to save in Corel PhotoPaint 12, ensure the drawing docker is open (ctrl-f8) and then press the gray arrow to expand to find the selection for saving image set.
NEXT PAGE - Fills and Fill Patterns
Comments? note: use the following link to also send comments to us regarding this page. Note that comments may be linked to from that page.
|